
Hello again! I am here once more to bring you a pattern I just created
for a Dog (or Cat) Butt Coaster pattern! I won't lie here. I saw one
of these on Instagram and loved it, it's so funny. (Credit to Leslie here. You can buy her version on her site!) There are a few
patterns on ravelry for cat butt coasters (I prefer cats, but why no Dog
love on this one?), one of which is free. Honestly, I thought they
could all use some improvement. I checked out the free one to see how
it was done (wasn't impressed [hey, I'm picky]) and then tried my own
method. I am very pleased with the results. Behold!
(Favorite this pattern on Ravelry!)
(Favorite this pattern on Ravelry!)
This is a link to a pdf file that is printer friendly - no pictures.
With no further ado, here is how I did it. The following pattern is in US terms.
Everyone loves a pattern with plenty of pictures, right? I hope so, cause I took plenty.
Materials:
G/6 - 4.25mm Hook
(Size/gauge is not extremely important)
100% Cotton Yarn (Colors: Pink, and your choice for fur)
Needle to sew in ends, and scissors to cut of course.
Finished size:
About 3.5 inches from side to side
(a little less depending where you measure)
6" from top of tail to bottom of feet
Stitches/Skills used:
Magic Ring (Optional)
Invisible Join (Explained + pictures)
Chain
Slip Stitch
Single Crochet (SC)
Half Double Crochet (HDC)
Double Crochet (DC)
Note for clarity:
SC 4 = SC into each of the next 4 sts.
2SC = Do 2 SC into same stitch.

Round 1: Using Pink. Magic Ring (or Ch2 and work into first Ch stitch) 6 SC.
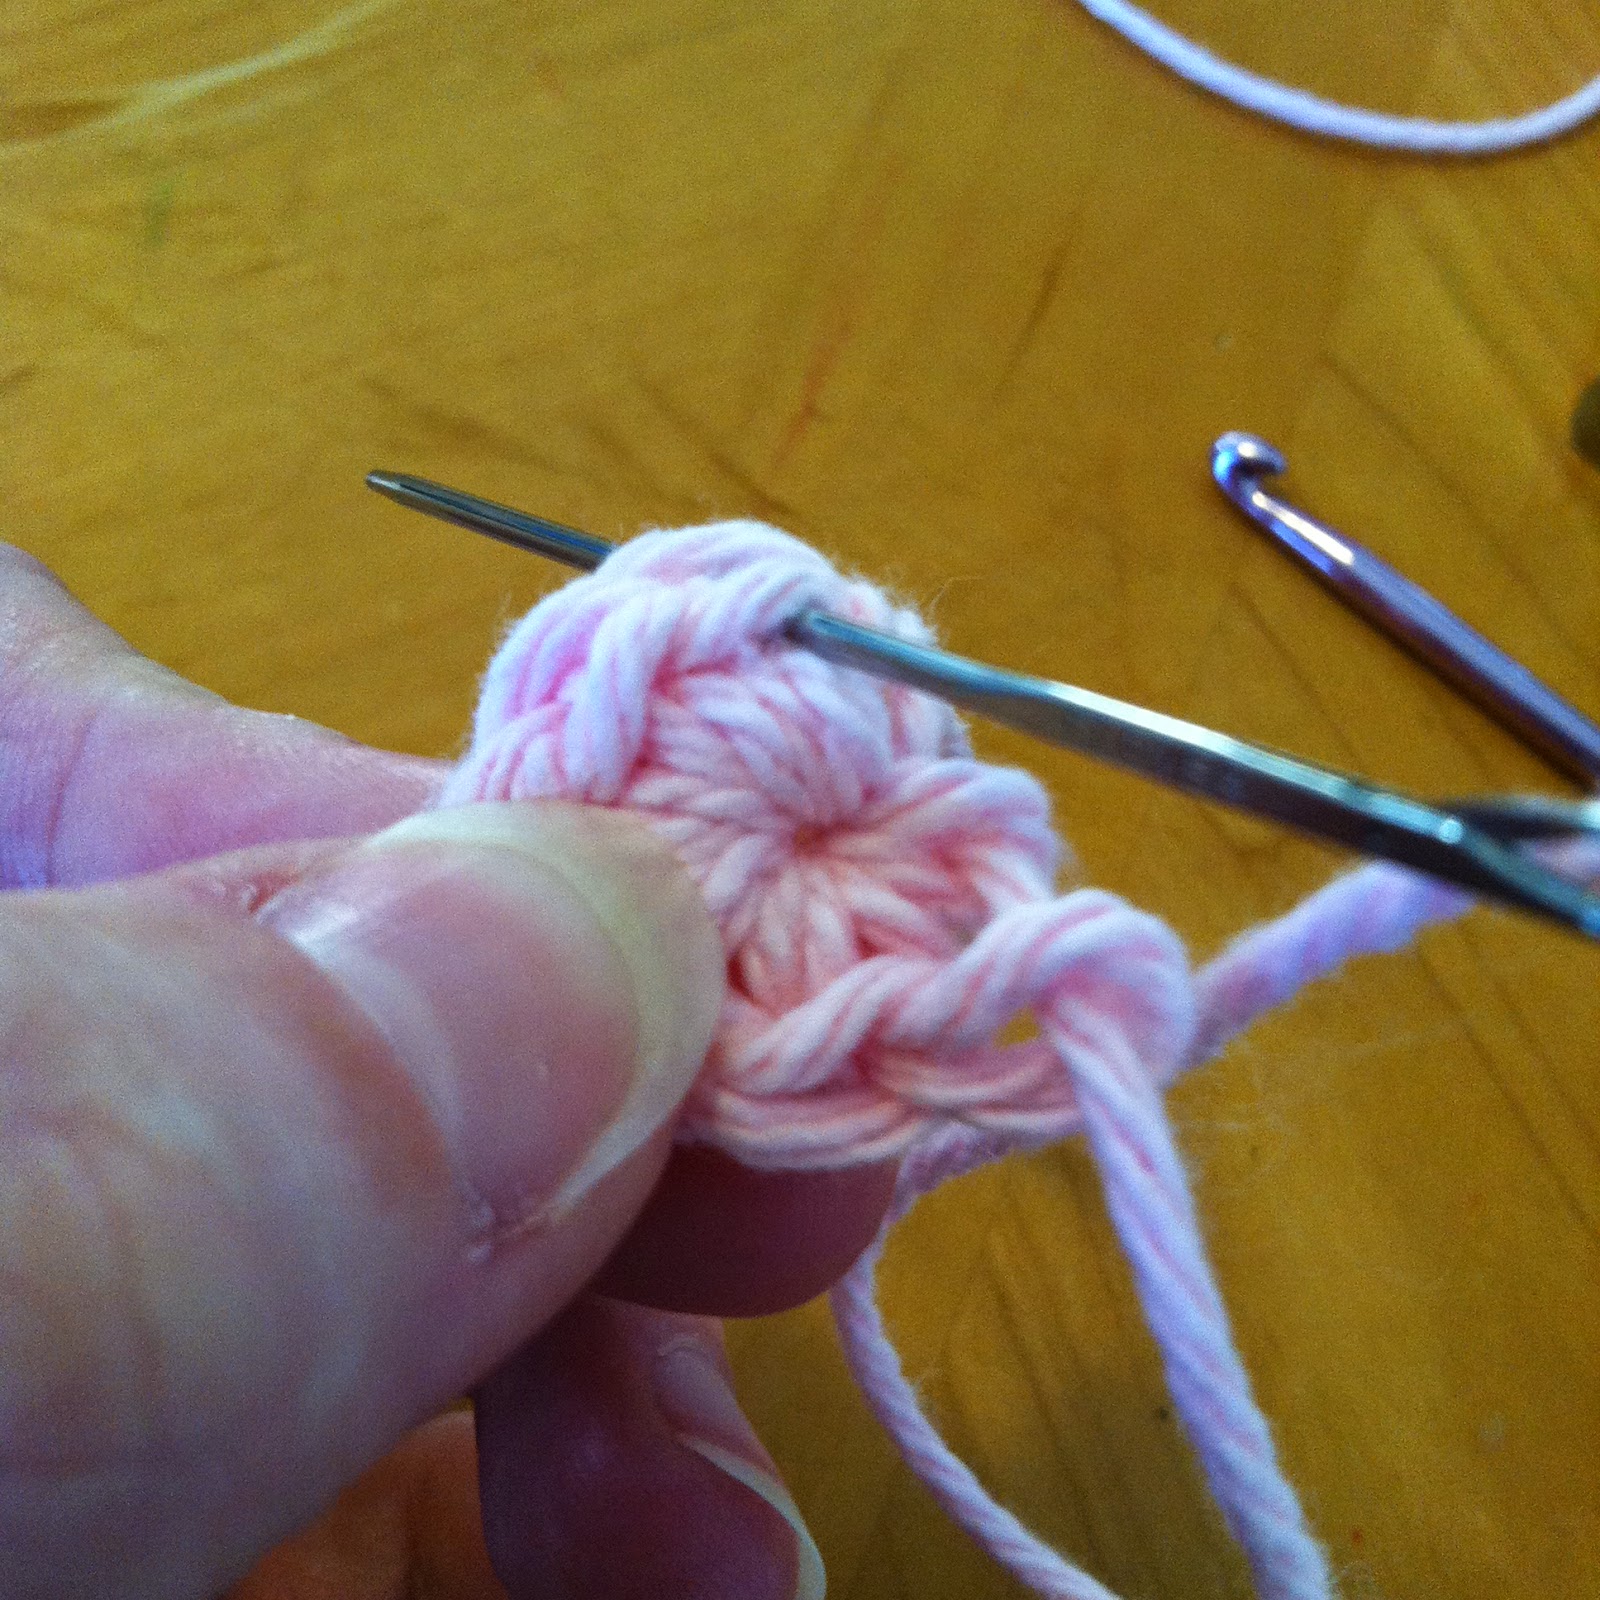
Invisible Join: Cut yarn leaving tail and pull the yarn through. Using a needle, pass yarn from the front toward back of the first SC of the round. Pass yarn into top of the last SC you made. Pull only tight enough to blend and create your 7th SC.
You should have 7 SC.
(See next 5 pictures!)
Alternately, you can just do 7SC and slip to join, then finish off.

 |
| This is a view of the back of the work. Needle enters top of stitch. |
 |
| The needle is inserted simply to show the 7th stitch we created. |
 |
| Completed, 7 SC. |

I apologize now for pictures that are sideways. Forgot to fix that before I uploaded all of them!
Round 2!
Create a slip stitch with your second color. I do not have a tutorial for this, but they are easy to find.
Join anywhere to your work with a slip stitch.
 |
| insert hook |
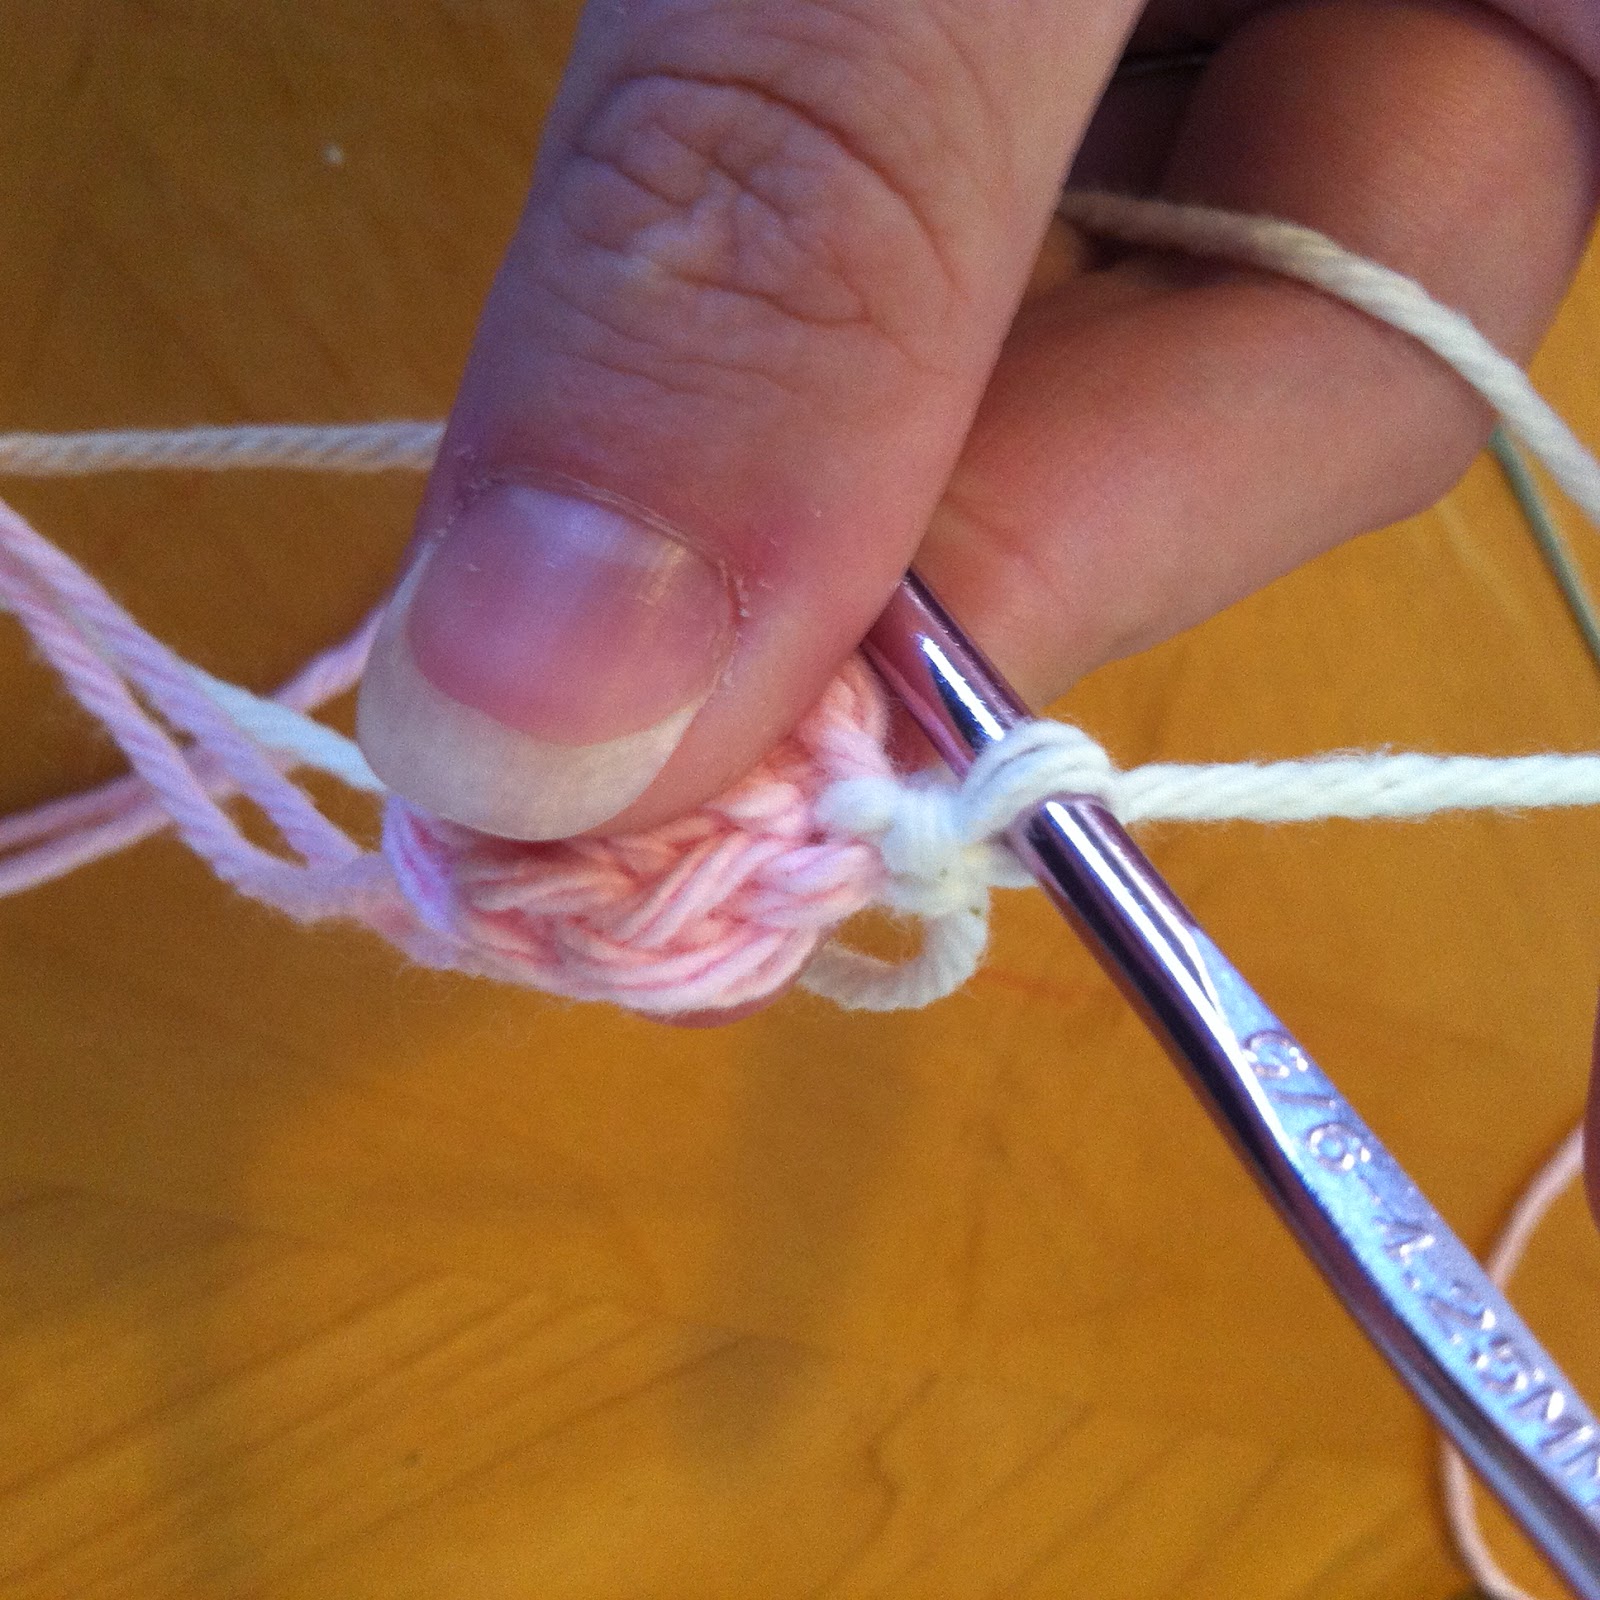 |
| After slip stitch. Pull your slip knot tight for the best look. |
Pull that slip knot tight so it looks good.
(Still Round 2) Ch 1.
Do not turn your work throughout the pattern!
Working into the same stitch you joined to, 2SC into each stitch. Slip sts to join. (14sts total)
I split the first 2SC between the start and end of round, but you don't have to do that!!!
 |
| I did one SC in the beginning and my second SC into the same stitch was at end of round!!! |
 |
| End Round 2. |
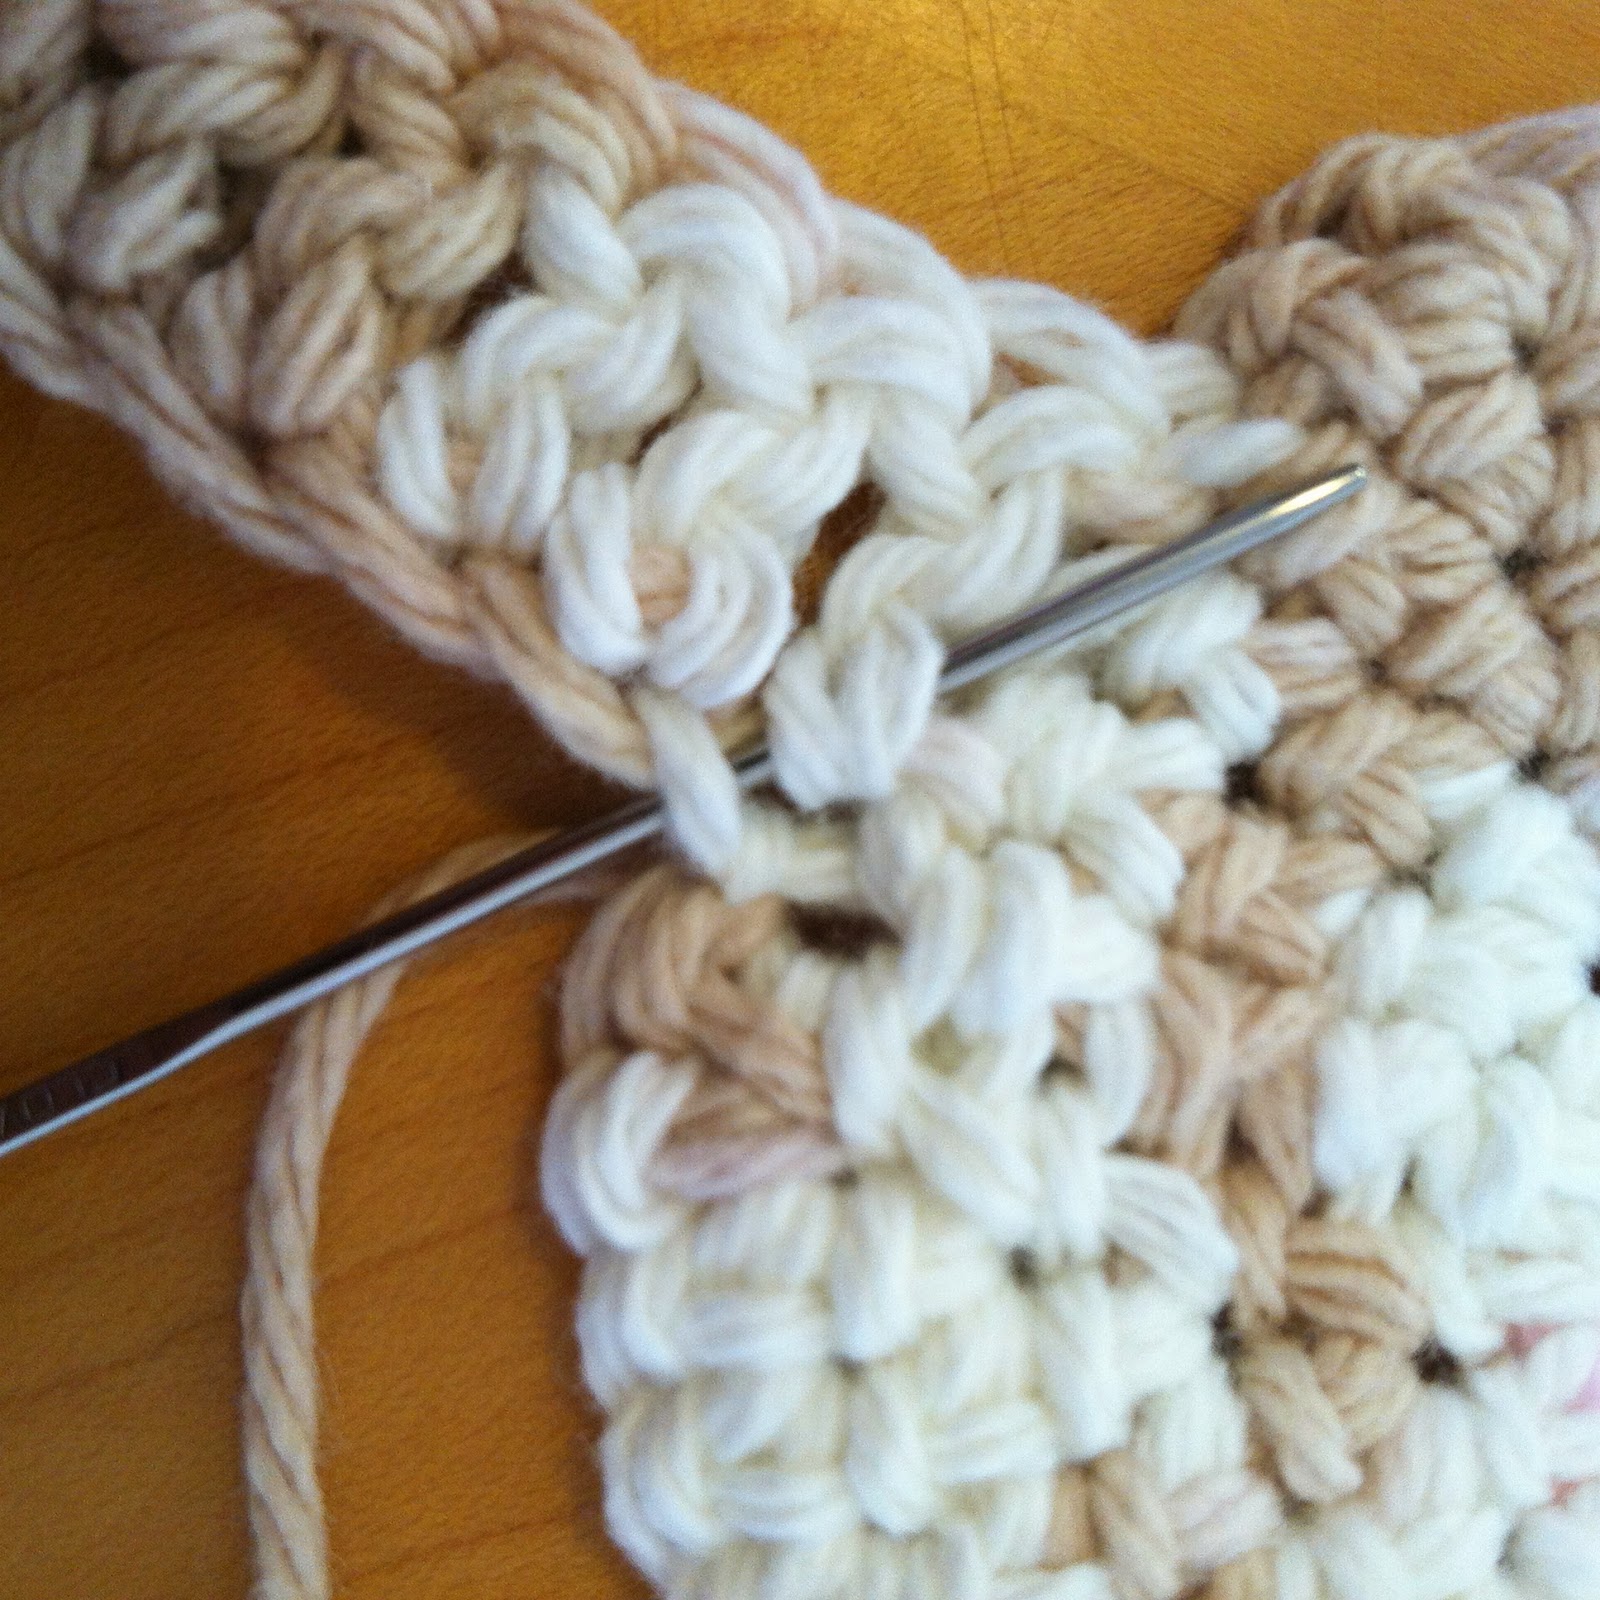
 |
| Round 5 complete. |
Round 3. (Work into sts you joined to)
Ch 1.
*SC, 2SC* repeat around to end. Slip Sts to join. (21 sts total)
Round 4.
Ch 1.
*SC 2, 2SC* repeat around to end. Slip Sts to join. (28 sts total)
Round 5.
Ch 1.
*SC 3, 2SC* repeat around to end. Slip Sts to join. (35 sts total)

Round 6.
Ch 8. In second ch from hook, SC.
HDC, DC 5.
 |
| Work into the bump on the back of the CH for best look. |
 |
| Tail completed. Hook shows where to work next SC. |

Round 6 continued:
Skip 2 stitches, which includes the stitch you joined to, and SC into the 3rd stitch. (Picture shows slip stitch - I have changed the pattern and no new picture)
SC 1. (see picture)
2SC, SC 4, 2SC, SC 4, 2SC, SC 1.

Round 6 continued:
Ch 4.
In 3rd ch from hook, DC.
DC in next ch.
DC in side of your last SC. (See next 3 pictures!)
 |
| My fingers showing the side of the SC stitch. |
 |
| Hook inserted into side of SC stitch. |
 |
| Third DC completed! |

Round 6 continued:
Skip 2 stitches. SC into the third stitch.
2SC, SC 1.
Ch 4.
DC into 3rd ch, as before.
DC into next ch.
DC into side of your last SC.
Skip 2 stitches. SC into the third stitch.
2SC.
 |
| Two legs complete. |
 |
| Slip into the slip stitch, right where my fingernail is. |
Round 6 continued:
*SC 4, 2SC* twice.
Slip stitch into the slip stitch that started the round! See picture.
 |
| Just showing where I wove my end in behind the tail. |
Weave in your ends and you are finished!
This picture shows where I weaved in. It hides well there. Of course, don't cut it here, keep weaving some more.
With the pink tails, honestly, I did a square knot. I figured a knot was not a big deal on the bottom of a coaster.
(Square knot: cross tails, right over left and knot. Then cross tails, left over right and knot tight. Or vice versa. I'm sure you can find it on youtube!)
There you have it. A dog, or cat, butt coaster.
I would maybe chain a couple more and do just DC down the tail for a cat coaster, so it's more round like the feet instead of almost pointy.
If you find any mistakes or need me to be less confusing (sorry if I'm confusing) do not hesitate to contact me!
Enjoy!
Love this pattern :) My niece has asked me to make her some. I did an example and put it up on my blog. I have linked it back to you :) Thanks so much!!!
ReplyDeleteThank you!! Glad you and your niece enjoy it. =)
DeleteThis comment has been removed by a blog administrator.
DeleteCONTINETAL LOAN COMPANY OFFERS 3% INTEREST LOAN TO THEIR CUSTOMERS, WE ARE BENT ON EASING THE STRESS OF TAKING PAY DAY AND CREDIT CARD LOAN, WHICH ATTRACT A HUGE INTEREST AND STIFFER PENALTIES WHEN YOU ACCIDENTALLY DEFAULT THEIR PAYMENT, WE OFFER VARIETIES OF LOANS, WHICH INCLUDES:
DeleteSCHOOL FEES LOAN
CAR LOAN
PERSONAL LOAN
HOUSE LOAN
INSURANCE LOAN
CHRISTMAS LOAN
BACK TO SCHOOL LOAN.
YOU CAN CONTACT US TODAY ON OUR EMAIL ON: CONTINETALLOAN@GMAIL.COM
Great pattern. Would like one a bit bigger to use as a hot plate.
ReplyDeleteThank you. That's a good idea. I will have to add a large version! :)
DeleteVery cute! Love the photo tutorial, too. Thanks for sharing this.
ReplyDeleteAny way to print this pattern ?
ReplyDeleteHmm. With the pictures, it certainly isn't printer friendly. Without the pictures, does the pattern make enough sense? I could try to figure out how to do a printer friendly version.
DeleteUpdated the blog post with a link to a pdf that you can view and print from the link.
Deletehttps://drive.google.com/file/d/0B9BLUR8FAe8BbVJzRm5aUzVTVjA/view?usp=sharing
This comment has been removed by the author.
DeleteGot it ! Thank you so much from all the stray/feral kittys in my town !!!
DeleteHow do you do the multi-colored one? I also saw one that's calico and one that's a black/brown. Do you buy special yarn? Or do you just intermingle colors?
ReplyDeleteThe yarn I used came with the multiple colors. Variegated is the term for it. Or Ombre. I think mine was Peaches and Cream "Natural Ombre". It's 100% cotton.
DeleteYou could use two strands of yarn but it wouldn't look exactly the same as mine. Two strands of sport weight is like a strand of worsted weight. Using two strands of worsted would probably be difficult unless you use a bigger hook, but then the size of your coaster would be much much bigger.
DeleteI have some old sandstone coasters that look nasty. I wonder if I could make a set of these, slip in the sandstone coasters then sew up the sides. Having tail and feet only on one side. (The bottom)
ReplyDeleteThe round cardboard coasters you get at Olive Garden, or in bars, works GREAT to do this....
DeleteThat is so cool. I wish I could crochet. I learnt it back in school, but that's almost 40 years ago! I shall have to re-teach myself I guess, cause I really MUST make these. :) Thanks for sharing your detailed instructions. The photos will surely help me a lot.
ReplyDeleteLuv
Barbarella
www.themadcatlady.com
Go on you tube plenty of beginning crochet lessons very helpful watch them and pick it up again. It's still there just need a refresher course. Good luck.
DeleteThank you for sharing this pattern! They work up so cute!
ReplyDeleteGreat pattern! I have several friends/family members that have asked me to make them some for Christmas.
ReplyDeleteAlso I was wondering if you allow people to sell the crafts that they make from your pattern?
Sorry for a late reply- not sure I saw it before.
DeleteYou are very welcome to sell items made from the pattern!
I would really like to learn how to crochet - can anyone point me in the right direction to learn?
ReplyDeleteYouTube has an amazing amount of video tutorials for learning crochet. I am also a member of The Crochet Crowd on FB, other FB crochet groups, the All Free Crochet website, Hooked on Crochet and Happily Hooked. Also, join Ravelry for great free patterns and friendships!
DeleteYouTube has excellent crochet tutorials for beginners
DeleteYouTube has excellent crochet tutorials for beginners
DeleteYou tube has beginning crochet lessons for you to watch
DeleteI like the Youtube videos by "Glamma" . She is sooo thorough that even us newbies can easily follow her. I don't recall her exact name, but if you go to Youtube and search "Crochet by Glamma" you should pull up a lot of her videos.
ReplyDeleteI like the Youtube videos by "Glamma" . She is sooo thorough that even us newbies can easily follow her. I don't recall her exact name, but if you go to Youtube and search "Crochet by Glamma" you should pull up a lot of her videos.
ReplyDeleteThank you for the free pattern. How can I send you a picture of the one I made? Kim W.
ReplyDeleteDo you use ravelry? (If you don't, I recommend it!) you could share a link to your project if you do use it!
DeleteHi! I am new to reading crotchet patterns. I can follow the this pattern/tutorial except for part of Round 6. Can you please explain this pattern: 2SC, SC 4, 2SC, SC 4, 2SC, SC 1 ? What is the different between the number being before SC vs after SC? Thanks
ReplyDeleteOops, I replied to the post instead of you. 2SC means it is all in one stitch. SC 6 means to do one SC in each of the next 6 stitches.
DeleteThanks! I realized after posting that this page explained that already *facepalm*
DeleteDoes it?! Haha, go me for including it. :p
DeleteSome people write patterns different. 2SC means to do 2 SC all in one stitch. SC 6 means to SC in each of the next six stitches. :)
ReplyDeleteHello!! I'll admit this is my first foray into crocheting in the round and I'm having a problem. My round keeps curling up as though I'm making a hat and not a coaster. I have unraveled several time and diligently counted the stitches and I cannot find the problem....any suggestions? I love the pattern and would love to be able to complete one of them!
ReplyDeleteAll I can wondernis that maybe your stitches are too tight? It might even just be the first two or three rounds. Try loosening up or even using a larger hook if you need to. After a few rounds switch to the smaller one. It took me a while to loosen up so it sits flat when I learned to work in the round!
DeleteThis comment has been removed by a blog administrator.
ReplyDeletedo you know what yarn you used for the color changing beige and white?
ReplyDeleteI think it was Peaches and Cream "Natural Ombre".
DeleteThis comment has been removed by the author.
ReplyDeleteCan you use worsted weight yarn for this
ReplyDeleteCan you use worsted weight yarn for this
ReplyDeleteI used worsted weight, yes. Cotton is recommended for its absorbancy. And if you alter it for a hot pad, cotton is again best as acrylic can melt under heat.
ReplyDeleteI'm a beginner all makes sense till round 4. Sc2,2Sc doesn't that just mean 2single crochet and then 2 single crochet repeat. I'm unable to follow the pattern.
ReplyDeleteI did mention this in the patten.
Delete2SC is an increase. 2 SC in the next stitch.
SC 2 is to work a SC in each of the next 2.
First of all I love this! it's so cute!...
ReplyDeleteAnd secondly I was writing you to find out if this person had your permission to repost your entire pattern. She has a lot of patterns posted that are not hers and yours, she at least put a little Link at the bottom that's how I found out it was your pattern. Anyway just wanted to make you aware and let you know. Here is the webpage: https://raisingbabycakes.wordpress.com/2015/02/28/catdog-butt-drink-coasters-so-cute/
Welldone and marvelous photos of rakhi sawant .... you are doing good work and
ReplyDeleteprovides nice article if you want to more then
cute cats photos download , cute cats photos, kittens cute cats videos, cute cats pic cute cats wallpapers free download , cute cats breeds, cute cat wallpapers , cute cat images gallery
My son sent this to me as a joke on FB cuz he knows I crochet... wait til he opens his Christmas or birthday present!!! THANKS!!!
ReplyDeleteI just finished my 1st one, a siamese butt!!! How can I show u a photo?
ReplyDeleteHey, Thank you so much for this post. Its really helpful.
ReplyDeleteBierdeckel bedrucken
Third year in a row my mom has asked me to make a bunch of these for stocking stuffers. This is such a quick pattern and they always make me giggle. But, I think my cats are jealous that I prefer these cat butts to their cat butts. Thanks for the fun pattern.
ReplyDeleteLove them!. I've taken it a step further and put a piece of plastic from a food container, on the back and a bit of that cheap non-slip matting you can get. They look really professional.
ReplyDeleteIs this something that someone could make to sell, without stepping on a copyright? I have a LOT of yarn ends that need using up, and an Etsy page that I'm starting up.
ReplyDeleteMy apologies for not replying in a tomely manner...
DeleteYou are free to make and sell items made from this!
hi tkx for the cute coaster pattern i used the peaches & creme 100% cotton and i used 2 strands to make it thicker and bigger :) turned out great tkx
ReplyDeleteThis comment has been removed by a blog administrator.
ReplyDeleteHonestly for me, I've never crocheted before. I bet if you made a video explaining step by step what to do, you would get a lot of hits. I know I would definitely save it and share it with my friends.
ReplyDeleteThank you so much for this pattern, I have just made one and hubby has claimed it, so I guess I will have to make another lol
ReplyDeleteWell no matter whose pattern it is, You did an excellent job showing by pictures how to make it! And for someone to take the time to do that I think they are really nice and I appreciate it very much❤❤
ReplyDeleteWow, I really like your post because the information which you given in this blog is really extra ordinary.
ReplyDeletecoasters
These are absolutely adorable. Much better than looking at my cats 'Real McCoy', lol! :D
ReplyDeleteAs for dogs, if it was just a tad wider, with a little stub tail that hangs down instead of points up, you'd have a perfect Pembroke Welsh Corgi bum. ;D Maybe for a hot pad under a baking tray? Heehee! https://www.pinterest.com/pin/864128247222756832/
This comment has been removed by a blog administrator.
ReplyDeleteHello :) if I wanted to make this into a hot pad size for dishes or pots, would using a larger hook be acceptable or would I have to increase the counts for the stitches and rounds?
ReplyDeleteYou could certainly try a larger hook. It would be a bit think and 'holey'... Maybe double strand the yarn? But that might be too big.
DeleteI should revisit this as There has been more than one looking to make a hot pad.
My apologies to everyone for basically abandoning this short lived blog! Lol
I love this, thank you! I do have one question. Where the tail and the legs attach to the kitty is it normal for there to be a bit of a loose space there or am I crocheting too loose or did you do something to close it up?
ReplyDeleteThere is a small gap there. I can't think of a better method. The looser the stitching, the bigger it may seem. You could do a slip stitch instead of sc when attaching, but that has pros and cons. It is a personal choice!
DeleteWould you consider turning this pattern into a pot holder pattern as well? Maybe adding a few alteration notes for a bigger circumference? My mom is asking for this and I am great at crocheting and knitting... just don't have the design ability :( lol
ReplyDeleteThis is a great pattern; thank you for sharing! I have made a few sets for friends and they love them. Would you give permission for me to sell the ones I make using this pattern? Please let me know, thank you!
ReplyDeleteYou are welcome to sell items that you make; of course! Glad you liked the pattern. :)
Deletewell hello i finally got to make one of these. i thought it was going to be so hard, but it was so easy. my printed copy shows pictures, so i only got stuck on the side stitch in row six so went to the actual pattern and did fine with it. i see lots of requests for a heating pad, did you ever get that pattern made for us to make? thanks again for the pattern.
ReplyDeleteHi Phyllis! Thank you; I am so glad you liked the pattern. I still have not made it in a hot pad size. I have neglected this blog quite a bit! I am swamped with projects at the moment but I do hope to add a hot pad sometime in the future.
DeleteHi! Thanks so much for making and sharing this pattern!
ReplyDeleteIf I can give you a little tip: if you increase in different stitches instead of the same stitch across the rows, you will get more of a circle than a hexagon. :)
(I don't know if someone else already told you this or if you learned it already since posting this pattern, but there ya go.)
Thanx much for the pattern, they'll make some great gifts!
ReplyDeleteNot sure if this post is still active, but I just made a Christmas tree decoration for my sister in her dog's colour. I love it :)
ReplyDelete